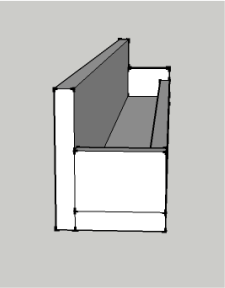
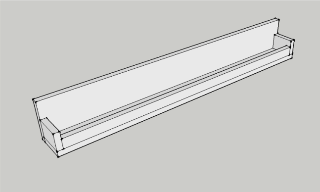
After I made all my cuts I went through my scraps because I knew we wanted to get rid of Alyssa's bedside table since it's huge and unnecessary and put up a small wall bookshelf, kinda like this one designed by Ana at Knock off Wood.
Originally I planned to use Alyssa's old boxspring since it had a bunch of decent boards in it and reclaimed wood (read: free) is always good. But I had so many good scraps left over from the headboards and guard rails that I said screw it.
I didn't feel like pulling out the jig saw, I just wanted something simple. So I looked at what I had and threw together my own plan, inspired by Ana's plan.
I cut all the wood already and now i just have to screw it all together when I get a free minute :) Took 5 mins to cut and honestly i didn't measure anything lol, I just based it all on the largest pieces I had and estimated. I lined a few pieces up to other pieces to make sure it was even cause I am OCD and cannot have a lopsided bookshelf, lol. But I have no idea how big it is.
But for the sake of creating a plan, I estimated it in case anyone else wants to build one :).
Shopping list:
1x6x6 (or shortest one you can find, scraps are best)
1x4x6 (same as above)
1x2x6 (same as above)
1 or 1 1/4" screws, or could use glue and brads or finishing nails
Cut List:
1x6x36" - Back piece (or 48" or 24" or however big you want it)
1x4x36" - Bottom piece
2 - 1x4x2" - Left and Right sides
1x2x34.5" - Front bottom piece
Directions:
1. Place the 1x6 on it's end and attach the 1x4 bottom into it at a right angle.
2. Attach the left and right end pieces by screwing or nailing up from the bottom of the 1x4 into the pieces making sure they are flush with the ends.
3. Slide the 1x2 into the space between the 2 end pieces and slide it so it's flush with the 1x4 and attach it through the left and right ends as well as a couple screws/nails coming up from the bottom.
4. Use wood filler if needed, sand, and finish with paint or stain.
Sorry I didn't do pics for each step but this is super simple so check out the pics and I'm sure you can see how to attach them all. If you have questions just ask :).


Thank you again Ana for the inspiration!
I certainly hope I wouldn't need a disclaimer for a simple bookshelf, but just to CYA, I made no express or implied warranties on the design laid out here as to weight capacities or how to attach it to your wall or anything of the sort, as I am new to this and you would be crazy to think I know what I am doing yet. Build at your own risk like I do and hope for the best and send pics if you do!
Thanks :)


I love Ana's shelves, but don't have a jigsaw. Thanks for putting together directions for how to do these little shelves without the fancy shapes! I want to make some for my kids.
ReplyDeleteNo problem. I have a jigsaw but i have no idea where and didn't feel like digging it out, lol, and I just wanted to use what I had on hand with scraps. It's still going strong and everyone who has seen it says how cute it is - its painted to match her bed too :)
ReplyDelete