Be sure to scroll down and select "older posts" to view previous posts or follow links on the right under "Blog Archive". Also feel free to comment or leave suggestions/tips/advice in the comments on any post, follow me on google, and/or share my blog with friends.

Friday, May 21, 2010

Project 1 & 2 - COMPLETE! Really this time!

Hi :) Well the conclusion to my first projects has come - the bunk bed is done and the bookshelf is also done. The bunk bed is not set up like a bunk, just 2 twins until the munchkin gets older, but it's still done, just no ladder. :).

What do you think? If you click on it, you can see it extra big (normally you can't with my blog pics cause I use photobucket cause it gives me more space)
Photobucket

All in all it went well. It was a giant pain in the butt not having my own space to work in and having to coordinate between Joey's house and what I could accomplish on my dining room table and my back patio. Next project we definitely cannot use spray paint for a clear coat because some jerk above us in the building complained to management about the fumes. lol.

I had a few snags along the way, but everything is pretty square and level, and we have a lot of scraps that hubby was able to make into a couple planters, so that's good.

Now that the beds are done he can then concentrate on his project, the aquarium stand that he's building at a friend's house.

Here are some more pics of the bed and then you'll see what is on deck for the next project :). (If you click these they won't get any bigger lol)

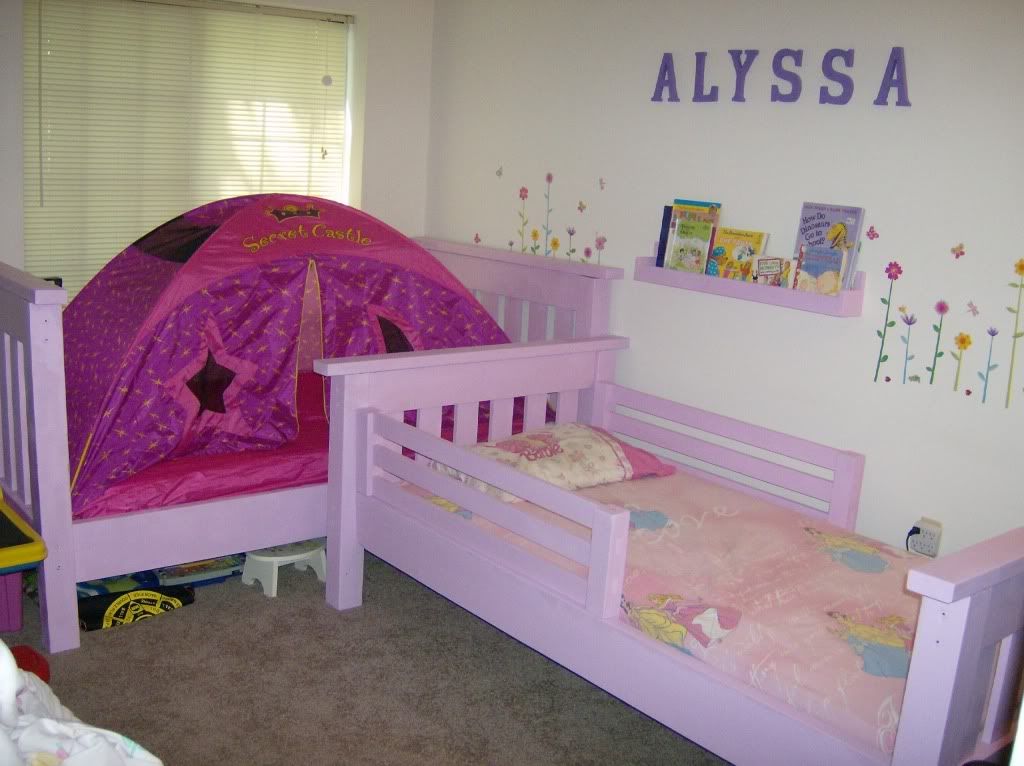
The "top" bunk & bookshelf
Photobucket

Her "secret castle" bed tent for her "bottom bunk"
Photobucket

Bookshelf
Photobucket

And lastly, can you guess who's room this is? lol. No I didn't make the letters, they were from Walmart and the flowers and butterflies are the cling stick on ones from Dollar Tree. :)
Photobucket

Thank you Ana from Knock-Off Wood for the plans and all the help along the way :)
Knock-Off Wood

Now, as for my next project, I'd really love to make a new desk. Here is what i'm currently working with:
Photobucket

Clearly it's not working lol. I need more nooks and crannies to store crap and more desk space to put stuff, like Alyssa's toys she likes to put on my desk for some unknown reason and maybe my phone and monitor lol.

This would be a more expensive project so I can't start it yet, but I'm thinking maybe a mixture of a couple of Ana's collections. I really like the modular office system minus the corner desk (don't have the space) and I like the hutch like parts of the classic storage wall system.

Here's a couple shots of the modular set. I want one CPU base and one drawer base and then just a straight desktop, no corner. I really like the secretary desk but it's just too big. (Click here to get to the plan)
Photobucket

And here is the hutch style top for the classic storage system desk or media wall (Click here for plans)
Photobucket

But I also need a solution for a printer table and for some books so I may make another alteration and make a 3rd or 4th bottom cabinet that sits sideways. Maybe I'll take the bottom half of the secretary desk and spin it at a corner and make a deep cubby out of it or something.

But anyway, that's the next project for me, when I get the time and the funds. I don't have a table saw and I'm kinda not all that enthusiastic about using a circular saw to cut a straight line - I'm not known for having a steady hand and I don't trust home depot or lowe's to cut anything. But we will see :)

Tuesday, May 18, 2010

Bed 2 DONE (almost) :-D

HI :)

Well it's been a busy week or so. Hubby decided to help me out while I was working, so we got a lot done. I puttied lots of holes and he sanded and did all the painting and putting on clear coat :).

Here he is, hard at work :)
Photobucket

And that night this is what was in the hallway :)
Photobucket

I had a pretty busy weekend with the munchkin, and apparently, she was just as tired as I was:
Photobucket

So we didn't get much done this weekend. But after work yesterday I got some energy and went to work assembling this thing while hubby was in class.

I don't have any pictures of the hilarious ways I got this monster together but you would be cracking up laughing as I propped up one board on a dresser or another hanging off the existing bed - all so I could line everything up :). But I got all the pieces of the supports and rails assembled so only needed help on the final assembly. If course I thought I was doing great because I was able to predrill all the holes for the giant 6" boolts that would hold this all together - I even got the screws started in the holes so all hubby would have to do is hold in place while screwing together.

Yea that isn't quite what happened :). He came home early from school and we tried to get it assembled but unfortunately I lined the holes up and centered them on the 4x4 rather then centering them where the edge of the 2x8 would go. So when I screwed the first screw in, it went directly next to the wood i wanted to screw into lol.

Needless to say that was not helpful so hubby got all the screws out and re-did the pre-drilling in the right spots and got the screws started, and then we worked together to line it up and get it all screwed in, the right way this time.

We decided to screw a couple of the bed slats in to make it more secure since I don't trust the single screw on each 2x2 at the end, they just were't as tight as bed #1's were so we figured better safe then sorry. Then we have some wood putty in strategic places from that and my original drilling error.

But we are essentially done because all that is left is sanding the puttied areas and also the guard rails that are sitting in my dining room, and then painting and clear coating again.

So here is the (almost) finished product - close enough because she was able to sleep on it last night :)
Photobucket

And when we do all the painting for the rest of the stuff, the new bookshelf from a previous post will get a paint touch up and then get hung up as well. It came out really well if I do say so myself, but you'll see a pic of that when it's all done :)

I think the bed came out pretty sturdy - what do you think?


If we tried that on a walmart type bunk bed I bet the headboard would have shook like crazy.

The taller bunk in the back will be where her "play fort" will be with the princess bed tent you see in the pic. It attaches to the mattress (once we buy one lol).
Photobucket

I had to explain once again why both beds were on the floor and told her when she is bigger the short one will stand on top of the tall one and then I'd build the ladder so she could reach. She seemed to understand :).

I think she likes her new big girl bunk bed :)
Photobucket

:)

Thursday, May 13, 2010

Footboards: DONE!

Bed #2 is well underway. After getting all the cuts done last week, every couple days I've tried to get some assembly work done. Hubby helped out a bit by lining everything up for one of them too and I got to play with all the glue and clamps again - and yep I used the giant manly man weights again lol.

Hubby and I did a bit of teamwork on these footboards to get the sanding all done. We finished sanding tonight and got the sides and tops put on just in time for our neighbors not to hate us lol, it was only 930 PM :). Much better then the midnight that we finished bed #1.

Hopefully tomorrow the rails, slat supports, and the slats can be sanded. Then we can paint and clear coat. Maybe by this weekend we'll be ready for that. We are going on a road trip on Saturday to VT though, so we may not have time. We will see.

Here is one of the completed footboards:
Photobucket

And while it may seem weird that I did 2 footboards, it makes sense when you know that the original plan I'm working with from Knock-Off Wood is creating 2 twin beds and each twin normally has a tall headboard and a short footboard. but in order to convert it into a bunk bed - the bottom bunk uses 2 headboards and the top bunk uses 2 footboards. So the completed pink/purple bed is the one with the 2 headboards, and this one we're almost done with is the top bunk.

Here they are lined up in my hallway, excuse the giant pile of laundry lol.
Photobucket

That's it for now :). Stay tuned!

Friday, May 7, 2010

My own plan, well sorta!

Well I realized today that I didn't have enough 1x4's cut for the 2nd footboard so I had to make another trip to Joey's after work for some time with Mr. Miter Saw.

After I made all my cuts I went through my scraps because I knew we wanted to get rid of Alyssa's bedside table since it's huge and unnecessary and put up a small wall bookshelf, kinda like this one designed by Ana at Knock off Wood.

Originally I planned to use Alyssa's old boxspring since it had a bunch of decent boards in it and reclaimed wood (read: free) is always good. But I had so many good scraps left over from the headboards and guard rails that I said screw it.

I didn't feel like pulling out the jig saw, I just wanted something simple. So I looked at what I had and threw together my own plan, inspired by Ana's plan.

I cut all the wood already and now i just have to screw it all together when I get a free minute :) Took 5 mins to cut and honestly i didn't measure anything lol, I just based it all on the largest pieces I had and estimated. I lined a few pieces up to other pieces to make sure it was even cause I am OCD and cannot have a lopsided bookshelf, lol. But I have no idea how big it is.

But for the sake of creating a plan, I estimated it in case anyone else wants to build one :).

Shopping list:
1x6x6 (or shortest one you can find, scraps are best)
1x4x6 (same as above)
1x2x6 (same as above)
1 or 1 1/4" screws, or could use glue and brads or finishing nails

Cut List:
1x6x36" - Back piece (or 48" or 24" or however big you want it)
1x4x36" - Bottom piece
2 - 1x4x2" - Left and Right sides
1x2x34.5" - Front bottom piece


Directions:

1. Place the 1x6 on it's end and attach the 1x4 bottom into it at a right angle.

2. Attach the left and right end pieces by screwing or nailing up from the bottom of the 1x4 into the pieces making sure they are flush with the ends.

3. Slide the 1x2 into the space between the 2 end pieces and slide it so it's flush with the 1x4 and attach it through the left and right ends as well as a couple screws/nails coming up from the bottom.

4. Use wood filler if needed, sand, and finish with paint or stain.

Sorry I didn't do pics for each step but this is super simple so check out the pics and I'm sure you can see how to attach them all. If you have questions just ask :).

Photobucket

Photobucket

Thank you again Ana for the inspiration!

I certainly hope I wouldn't need a disclaimer for a simple bookshelf, but just to CYA, I made no express or implied warranties on the design laid out here as to weight capacities or how to attach it to your wall or anything of the sort, as I am new to this and you would be crazy to think I know what I am doing yet. Build at your own risk like I do and hope for the best and send pics if you do!

Thanks :)

Saturday, May 1, 2010

Voila! Bunk 1 is Complete!

Well as promised, I have more pictures. We were pretty busy all during vacation, and Friday was no exception. All day long was spent sanding and painting the new boards (the ones I cut wrong previously) and clear coating everything.

I also had to re-paint one of the headboards because the walmart clear coat turned yellow when it was applied. But I reapplied the pink and on my 2nd trip of the day went to Lowe's and got Valspar clear coat and it was so much easier to spray and gave a much smoother finish, almost the same price too so definitely worth it.

After realizing I got the wrong screws for the bed rail brackets I made the 3rd trip to Lowe's and by the time I returned we got started on assembly.

The center frame was a pain to get straight but we did it and got everything attached and marked off the headboards to get the hardware on them to attach the rails - lifted up the rails - only to find out the hardware will not work with the simple bed lol. I probably should have checked that first based on the drawings but hard to picture it all until it's together. So we had to unscrew everything off the headboards and then decide to just say screw it, no I really mean to screw it lol. We had some screws I used for the posts so we used those and just screwed the headboards on.

Unfortunately the screws were only 4.5" long and we wanted a bit more security for the bed then an inch of metal holding it up, even if we tripled them up. So we put it all together with the 4.5's and decided I'd be making yet another Lowe's trip in the morning to get the 6 inchers. The 4.5's would hold up for one night and we weren't about top stop considering it was approaching midnight and the munchkin had to go to bed sooner or later and I'm sure my neighbors had enough of hearing the drill lol.

So that all being said, I now have to return some hardware to Rockler, and many screws to Lowe's, but we have a completed bed. I got the long screws today and hubby attached them while the munchkin ad I went to a kid's bday party.

We didn't use a boxspring, instead I cut 6 slats out of 2x4s, 38.5" each and to make the frame a bit lighter for moving, we just pushed them into place instead of screwing them. Also I didn't use 2x6s like the plans had, we wanted to not bother with a boxspring but I didn't was the mattress to stick up too high, so I went with 2x8s.

I have to say that my child is quite smart - she has known that mama was building her a bunk bed for quite some time and always asks if I'm done yet and I keep telling her not yet - so what's the first thing she says when we show her her new "bunk bed"? Listen and find out (picture is useless, it was night with bad lighting so it's mainly an audio clip):


That's right - she didn't jump and down all excited and happy - nope, my smart little chicky was confused because she knew a bunk bed was 2 beds and she only had one lol. Once we explained that mama can only build one at a time, then she understood and we got the expected response (at the end):


Time for some pictures!! She loves it and keeps climbing all over it, definitely no top bunk for her for a while, lol, it will end up being on the right side of the room and take up a lot of room but we'll make it int some kind of toy storage play house when it's not in use or something :).

Ta Da!
Photobucket

Always likes to measure herself :)
Photobucket

No she's not this tall - she's standing on a slide behind her bed:
Photobucket

Testing it's strength
Photobucket

Pretending to sleep
Photobucket

Supports a mama too! Alyssa decided it was time to jump on me right when the shot snapped lol
Photobucket

Tight rope anyone?
Photobucket

And just the same one from yesterday because it's just cute
Photobucket

and this one is just for the guys who doubted a chick's ability to use power tools :). Yes I do know how and yes, I own a level :-p.
Photobucket

Knock-Off Wood

Now my hands are sore and my back aches, but it's done and I can relax the rest of the weekend, bed #2 can wait til I have a free lunch break or weekend free :).

Special thanks to Ana at Knock-Off Wood for the plans and encouragement and of course a big thank you goes out to hubby because he supported me doing this project solo and kept the munchkin out of my hair and as always was the heavy lifter when requested and helped with assembly, especially on his vacation from work :-* :).

Vacation Day 3: Bed #1: DONE!!!!!

This is merely a teaser because the pictures came out kinda dark, but as of midnight, bed #1 is done. Woohoo!! We have to get some longer screws tomorrow to reinforce the rails, but as long as she doesn't jump on it between now and tomorrow afternoon - we should be good :).

Here's your teaser shot - more to come tomorrow!
Photobucket

Thursday, April 29, 2010

My laser blew up!

:) Thought that might get your attention :).

I had my first board kickback today, that was oh so much fun. I was trying to trim down a 2.5" piece of wood which is nearly impossible anyway but then you add that I was steadying it with a 2x4 to hold it still and it seems there may also have been a big ole knot in it. But all combined, my miter saw just wasn't a fan. I heard a giant pop like a muffled gun shot and thank God it went backwards and all around and away from me. The piece of wood literally blew up and was in like 8 different pieces and spread in about a 180 degree arc around me. On the ground underneath my saw was this:
Photobucket

That would be what is left of the plastic piece that was holding up my laser line. I didn't get a shot of the actual laser line but the light is hanging by the 1/2" cord.

Thankfully I did not get hurt and my saw still works fine, just the poor laser light needs a bit of doctoring, thankfully it's under warranty.

As for the rest of my day, well God was good to me a few times today because it was a beautiful and sunny day and not a hint of rain. It was warm enough to work outside with a t-shirt but not so hot that I was roasting - perfect.

I unfortunately found a glitch in Google Reader today - the plans on the site I'm using discussed the measurements for the side rails because they were originally designed to be too short since a standard mattress for a twin is 75" long, so she fixed the design. Unfortunately Google Reader didn't print the newest version of the blog when I printed the plan and I didn't notice it when I did the cuts for bed #1. Thankfully I caught it before cutting for bed #2.

So now I have two 72" long 2x8s that are pink/purple and two 73.5" long 2x2s sitting in my hallway that I will have to find another use for - maybe a bench or bookcase or something.

So of course I had to make a trip to Home depot to get more wood, and I asked hubby to go for me midday anyway because I ran out of 1x4s, no idea why, but oh well.

so Hubby went to HD once midday for me, then again with me later in the evening for the 2x8s, but they didn't have the 2x2s I needed so then I went sans hubby but with the munchkin 20 mins away to another HD that had them. I hate 2x2s, seriously. They are soooo hard to find straight and square. Me and the HD guy went through 6 bundles of these things to find 2 decent pieces and 1 that was half good - which only worked cause I only needed 35.5" off that one lol.

After all the beautiful sunshine, busted laser, blown up wood, incorrect cuts, and missing wood I was finally done for the day :) and all of the cuts for bed #2 are DONE!! I also did the cuts for the guardrail as well. Since we aren't letting her sleep on the top bunk for quite some time and we're leaving them as 2 twins for a while, I didn't bother cutting the ladder yet.

Joey's patio is all cleaned up and tools are all put away and all the wood is jam packed in my apartment so I can assemble the footboards tomorrow.

Gotta "love" apartment living - here is the giant stack of wood hiding behind my recliner. There is also a random 2x8 in my front closet and all of the painted pieces are hanging out in the hallway lol
Photobucket

Photobucket


That's it for tonight, hopefully tomorrow is less eventful :). The hardware should be in for bed #1 though :). I just have to sand and paint the newly cut boards and clear coat everything, then it will be ready for assembly :). Hopefully while it all dries I can assemble bed 2 :). Then if all goes well, by the end of the weekend Alyssa will have the 1st of the 2 beds to sleep on and the 2nd one will hopefully we done or almost done.

Wednesday, April 28, 2010

Vacation Day 1: Bed 1 is all painted!

Well today started off lovely - raining, snowing and freezing cold. Not exactly ideal building weather. I got up reading to get going but was sadly disappointed. But once hubby got some gardening done, I was able to set up and get some painting done in the kitchen.

I got the 2nd headboard painted and after that I froze my butt off on the back porch sanding the rails, supports, and slats.

I hate 2x2s. They are evil. They have way too many imperfections and they snag you and it's almost impossible to sand without ripping off sections because of the screwed up edges. And those were the GOOD ones that I had to hunt through like 50 different boards to find a few straight ones.

But everything got sanded and hubby helped me out so we tag teamed it a bit and I sanded while he took over the painting station ion the kitchen and got everything painted. Then once all of it was done and dry, I came in and did the touch ups.

So it's all done and ready for hardware, which should be here by Friday according to the UPS site :).

We could have put the center together (the part that supports the bed slats) and just waited on final assembly of attaching headboards to rails, but I see no point in having that huge thing sitting in my dining room for 2 days. :)

Here are the completed pieces hanging out in my hallway :)
Photobucket

Tomorrow I plan to go back to Joey's house and get the rest of the cutting done and assemble of at least 1 foot board (top bunk has 2 foot boards being used as a head and foot board). Please don't rain, please don't rain, please don't rain!!!!!!!!!!

I just asked Alyssa if she loves the pink/purple color and if it's pretty. She said yes but it's not beautiful because it needs a flower. Of course, how could we possibly have forgotten a flower (insert sarcase here). Hubby seems to think he'll be painting a flower on the headboard now, but it's not happening. We'll use the dollar store cling on flowers that are on her bedroom walls then her highness' bed will match her bedroom. There will be no messing up the atrocious pink/purple now that it's done lol. And she will think it's beautiful!!!

Monday, April 26, 2010

Headboard Painted!

I was able to sneak in some time to paint one of the headboards today. I got one side dry and painted the other, but of course it's starting to rain so once it was like halfway dry, we brought it in to dry in the living room.

Here's Alyssa supervising me on the back porch and pretending she is shy. That's her chair i was sitting in to paint lol, it was easier cause it was lower to the ground :)
Photobucket

That was side one, this is the completed one. I just have to spot check and do any needed touch-ups and then add a coat of polyurethane.
Photobucket

It looks kinda like a mix of light pink and violet. Much better then pepto bismol :).

I have Wednesday through Friday off for vacation this week so I can get more work done on this, although it's supposed to rain on Wednesday. but if i can get the munchkin to stay out of the living room I can probably sand the rails and assemble the supports and maybe even paint them and the 2nd headboard. Then one bed will be done so when the sun comes out on Thursday I can hopefully get started on bed #2. I don't have the bed hardware yet for either so even if I finish on schedule on Wednesday with bed 1, I still won't have the hardware, but that should be relatively easy to install.

:)

Saturday, April 24, 2010

Pink Tiara it is!

The color of her royal highness' bunk beds that is :). We went to Walmart to get some Kilz paint - they have the stuff that is paint and primer in one - so we picked a few color samples and showed Alyssa. She liked them all, every time we picked a new one she said she loved it and it was her favorite. So finally I grabbed 4 choices - a couple pinks, a purple, and a light green and told her she could only pick one favorite and she grabbed "Pink Tiara" which kinda looks like a lighter version of pepto bismol lol. the best part was the price, only $22 something. The Behr Premium Plus Ultra with the primer and paint was almost $35.

I thought of doing the beds white but she loves pink and I figured white would get too dirty. If we hate it we can always change it later.

Once we got home, I ordered the hardware for the bed. Instead of screwing the rails to the posts, we're going with brackets that will allow us to disassemble the bed as needed. considering we are renting and will move probably a few times during this bed's lifetime, I figured that was the safest bet. I did get a suggestion to use heavy duty hinges and just pop the pin out when needed, but the brackets were under $13 for the whole bed and I had a coupon - couldn't beat that and they will be way easier to work then pulling a pin out.

Here they are:


They will be totally invisible from the outside too :) I found them at Rockler.com.

As for the building progress, I got the 2 headboards all puttied and sanded and they just need paint. I still have to sand the rails and attach the slat supports but that's pretty simple. then of course need to paint them as well.

I actually talked to 2 friends today about my project, guy friends. If they were standing near me I probably woulda slapped them around a bit lol. The first was asking me to name all the tools I used and then asked if I made sure to use safety goggles and if I had a level as if somehow I wouldn't know to use those. Of course I got the last laugh when first - he asked me if I had a level AFTER I told him I had a combination square - which for anyone who works with tools you know that it is a square with a level build right in, and second - he opened this blog and saw my pictures and was amazed lol. The second friend saw the pictures and said "they were better then I expected they would be" and seemed to think it was a compliment. He tried to cover his tracks and say that most women wouldn't use tools or build anything. Shame shame shame. But I know for a fact that many women are proving him wrong on a daily basis and reminded him about that little song "Anything you can do, I can do better!" lol.


For kicks, check it out!

Thursday, April 15, 2010

Headboard #2: DONE!!

Well the glue from earlier dried so I was able to get cracking on the top boards and my clamps, although pretty, weren't quite big enough to hold the wood in place so I had to use screws in addition to the glue and "clamps"

Ya like my impromptu clamps? Hubbys weight bar weights with ankle weights thrown on top for extra weight :)
Photobucket

Had a little minor countersinking emergency because I countersunk the screws a tad too much on one section and created a nice gash in my dining room table. oops lol. But thankfully we got the screws out and redid them elsewhere and nothing a little wood putty can't fix.

I blame the ancient drill, see the one on the right lol. All his fault :).
Photobucket

So once I got that all screwed in and drilled some pilot holes for the posts, I solicited help from hubby to hold the center piece so I could attach the posts. We also got the top board on as well.

Photobucket

So now both are done and we are most of the way done on the bottom bunk. The side rails are already cut and hanging out in Joey's shed, so all that's left to build is the frame that holds the slats and add the slats. Then lots of sanding and then painting then assembling.

Photobucket

Photobucket

I couldn't decide if I wanted to stain, paint, or just leave natural and clear coat it. I love the natural look but the wood's color tone is different because the posts are fir and kinda reddish and the rest is white pine. I don't think a dark stain would look good in Alyssa's room cause everything is so light and cheery in there. So I'm thinking I'll prime and paint it white and then when i build myself a desk I'll use a dark stain for that instead :).

So far for time I spent about 3 hours last Saturday cutting and 3 hours on sunday cutting and assembling, and between lunch and dinnertime today, probably 1.5 hrs. So 7.5 hrs so far, and still within budget of the wood we bought. I only screwed up one cut (crossing fingers that i didn't just jinx myself lol)

Cya!

Lunchtime building

HI,

Well once the kid went to the babysitter today and I had a few minutes to spare at work (I work at home), I decided it was time for lunch, although I wasn't cooking :). I covered up my kitchen table with a sheet and decided to piece together the next headboard.

I was being lazy and didn't feel like bringing out the drills this time and after chatting on facebook with the famous Miss Ana over at Knock Off Wood, I knew that I could just use a nailer and use glue, or just try glue and clamps as the headboard was mainly decoration and the real power behind the beds were in the legs, rails, and slats and that's why those get screwed in. So since I'm too cheap to get a brad or finishing nailer to hold the wood while the glue dries, I opted just to use glue and clamps.

Using the tablecloth probably did more harm then good cause it made it hard to slide the wood, but I didn't wanna scratch my table :).

Photobucket
(I just noticed my clamps match my tablecloth haha)

It seems my wood was slightly off because at the beginning I was all even on all sides but as I moved along my rails started to not touch the ends of the headers. I figured I cut them a tad short cause of the kerf (thickness) of the saw blade so I kept on going. I realized at the end that I probably cut them right but I think the angling of the wood was off or the headers were not totally straight.

This is how I was shown to make sure it's square - measuring from opposite corners - the measurement should math. Of course mine didn't. I'm like less then a 1/2" off. not too bad and not much i can really do about it now since it's all glued and clamped.

Photobucket

Photobucket

But considering it only took me 20 mins or so to get it all lined up, I think it looks pretty good. I still have to glue on the top board and I think once that glue dries I probably will drill some screws through at least a few spots to make sure it all stays nice and pretty. Then I'll have to recruit a helper, AKA hubby, to help with the posts as someone needs to hold steady while the other uses the drill.

And now I'm off to actually eat something on my lunch lol.

Monday, April 12, 2010

Headboard: DONE!

Thanks to another sunny day yesterday, one headboard is all assembled! I finished up the cutting for the bottom bunk.

Photobucket

Then the boys watched the kids while Joey and I did the assembly work.

Photobucket

Gotta check out Joey's shirt in that pic :). I gave it to her for Christmas. If you can't read it, it says "SARCASM: just another service that I offer" Very fitting lol.

The spacers in between the headboard rails were a bit off, probably 1/8 of an inch or so, so I had to cut them down a bit to fit perfectly.

We also had a bit of issues trying to use nails as suggested by the plans because we didn't have a nail gun and I'm not about to buy one. So we decided on screws and I made a mid-day run to Home Depot for some tiny screws.

One of the tiny little drill bits is somewhere in the headboard because it never came back out lol, but we were able to use another bit I had luckily because we needed to pre-drill all the holes.

Here is the completed headboard, with headless me standing behind it :) That should give you an idea the size of this thing.
Photobucket

It's really heavy, and those 4x4s on the ends were killer to attach, mostly for Joey cause I did the drilling and she did the screwing. We used hubby's drills and the screwing one is ancient and weighed like 10 lbs lol. Not easy to hold in mid air and apply pressure.

We packed up everything and put it away and I brought all the cut up wood for the foot-board home so I can build it here. Of course I live in an apartment so hopefully my neighbors don't mind the noise of the drill over and over.

The headboard still needs sanding so I'll probably sand them both at the same time so I only have to clean up the mess once :).

I left the rails for the bed at Joey's there is no way that I can maneuver 2x8s in this place for assembly work.

This is going to be one monster heavy duty bed :).

Alyssa still keeps asking every day if I finished building her a bunk bed yet. She sat at Joey's in the window watching us work. Today she asked daddy if he would make her a bunk bed and he said no, and that mama is making her one. She goes "ya and I saw her and she made one and then has to make another and another". She keeps walking by the headboard and rubbing the wood, and I just hope she doesn't get a splinter lol.

It looks really nice in the house, I'd love to stain it instead of painting it but we will see. Alyssa wants pink and just not sure how I feel about quite that much pink lol. It looks great natural, but it's not "pretty" like a pink bed would be. lol.
Photobucket

Saturday, April 10, 2010

HI, it's not raining - Can I come over?

That's how I greeted Joey this morning when I got up and realized how nice it was and how very very wrong the weather channel website was the other day. All week long I've been dreading another rainy weekend and it even said there might be snow. thankfully that didn't happen and it was in the 50's and breezy but sunny and not a cloud in the sky.

Joey's hubby was not able to watch her munchkin so I was flying solo again today but I was able to get a good amount done. I brought hubby's garden wagon with me to haul wood from the shed to the patio - gotta love bungee cords :).

And ya know you are looking at a mom's toolbox when you find a stray pull-up mixed in with drills and saws lol.

Just about all the wood for the headboard and footboard for the bottom bunk is cut. I did all the headers and the rails and the spacers and the posts. The only things I have left for that bunk are the side rails and slats/mattress supports and the top rail for each end of the head and footboards.

If I didn't have to haul everything out and then put it all away I could have been much more productive, lol, but that's life without having your own place to work.

Here's the wood, another mama specialty - wood stacked in an old laundry basket :)
Photobucket

You can't really see them in the pic but the spacers that go in between the rails - my neck is killing from bending over measuring them. 28 pieces, each one only 2.5" long lol. That's a lotta little pieces!!

Oh and just a little side note as a warning for others not to be as dumb as I was today - if you are using a saw that has a sawdust bag, and you take off the bag to unzip it and empty it - when you put it back on - be sure to zip it back up. If/When you don't, you end up with a nice little mess all over the ground and yourself.

I think another half day of cutting and I can get everything sanded and then start assembly. I'm building it in pieces so I can paint it and then transport here to put it together :). Once one bed is done I'll do the 2nd one and then the ladder and side rails.

And now that I'm done sharing I need to jump off here and jump in the shower. Saw dust is itchy!